Close Up

August 17, 2011

Last weekend, Michael and I took a drive out to Mount Usher Gardens to visit some new (and newly engaged!) friends. We had a fantastic morning and I’ll be writing more about it for you soon.

But for now, I thought I’d share my favorite trick my fun, fancy camera can do. Close ups! I dug out my manual, and I have the best of intentions of finding my way around the camera (just like Kara!) but for now, I’ll settle for something I think I’ve managed to get the hang of.

{pretty blue hydrangeas – you can’t tell here, but the petals were just enormous!}
{I love cosmos – must add them to the garden next year. They’re so cheery!}
{I don’t know what this guy is called, but I liked him. So vibrant red!}
{and one more cosmo for good measure!}


Kara’s Photo Tips: Indoor Lighting

August 16, 2011

Happy Tuesday, darlings! Thank you so much for all your nice comments about my sea glass art yesterday! I’m so glad you loved it as much as I do!

We’re back with another fabulous photo tip from Kara today! I love this tip because it is so helpful in taking food photographs (I struggle with mine!). And after reading Kara’s tip this week, I finally dragged out my camera manual and started reading it. I am determined to master my camera like she has!

And check out Tip #1 and Tip #2 if you missed them the last few weeks! Thanks, Kara!

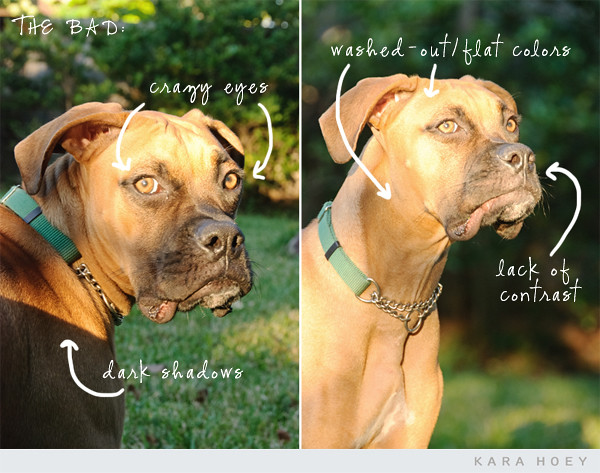
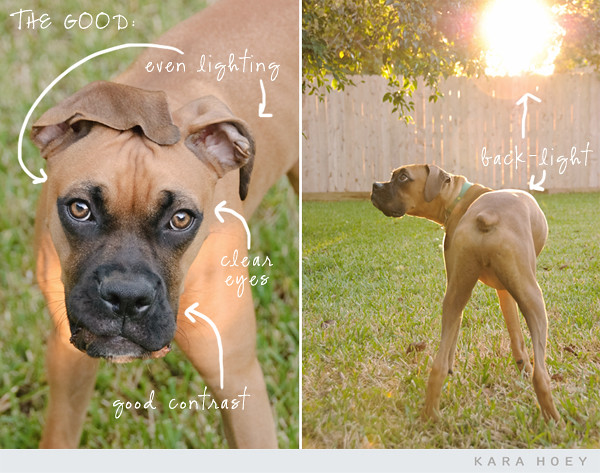
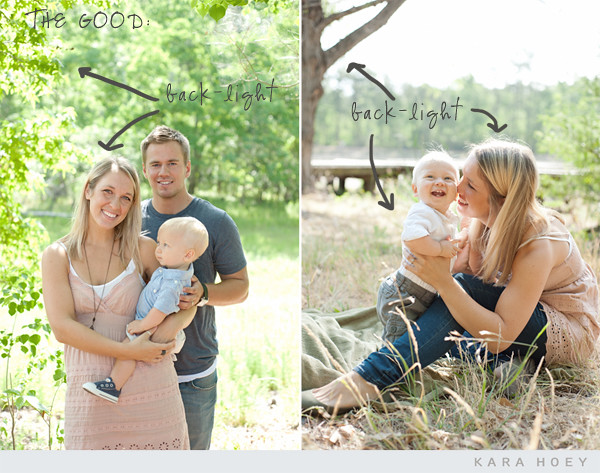
Hello From China Village Readers! I hope you enjoyed last week’s tip on using sunlight to create the best image.

This week I want to show you how cameras interpret Indoor Lighting and how an artificial light source can alter the color of your images. You’ll be surprised by the examples I show below!

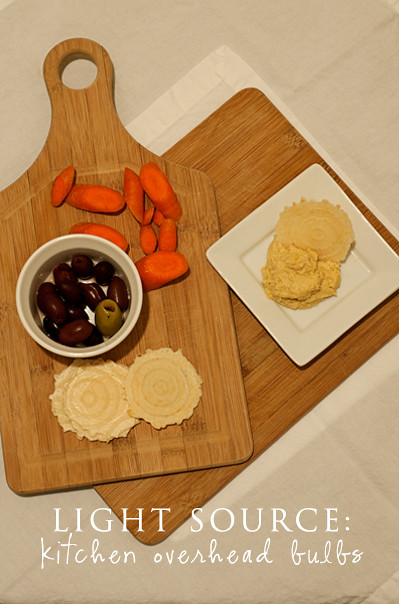
Whether it’s a birthday party, pet, or a gorgeous dish, there are many reasons I find myself taking photographs indoors.  Usually there’s little control over the light source we use indoors – we’re limited to lamps, overhead lights, or window light if we’re lucky.  Have you ever noticed how some indoor images can look yellow or blue?  Maybe you’ve never noticed. I know that I didn’t realize this until I learned about White Balance.  Before we dig into the details of White Balance, let’s take a look at one image taken under different indoor lighting scenarios.  I put together a little snack prop for us (please excuse my lack of food styling skills). In each scenario below, I let my camera decide the appropriate white balance (or color temperature) by setting my camera to Auto White Balance. Please note that all computer screens and internet browsers are different so the color on your monitor may differ slightly from my descriptions below.

When my hubby and I make nice meals at home, I love taking pictures of our food prep and the final dishes – so I always find myself in our apartment kitchen (with no windows) under unflattering incandescent bulbs.  Let’s start there. With my camera set to Auto White Balance, here is the image that I captured.  You’ll notice very quickly that the image has a yellow and green tone that makes these appetizers look unappealing – not really what I’m going for with a food image.  The overhead lighting has turned my dishes and napkins from white to dingy.  I must admit that it’s a bit embarrassing to show this image!

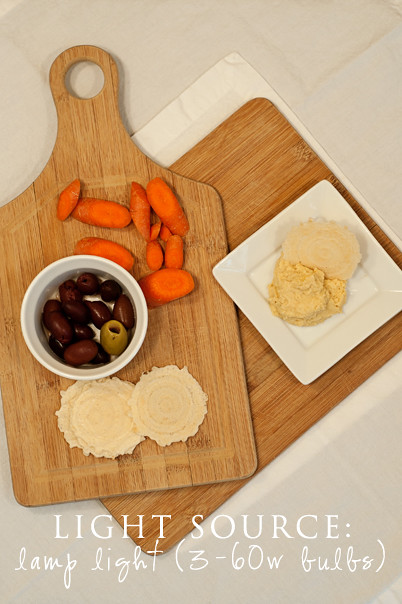
Let’s move on to my living room where I have a large lamp with three 60 watt bulbs.  This lamp offers a lot of light if I need it.  With my camera set to Auto White Balance, there’s definitely some yellowing of the image.  My food is still looking a bit unappealing.

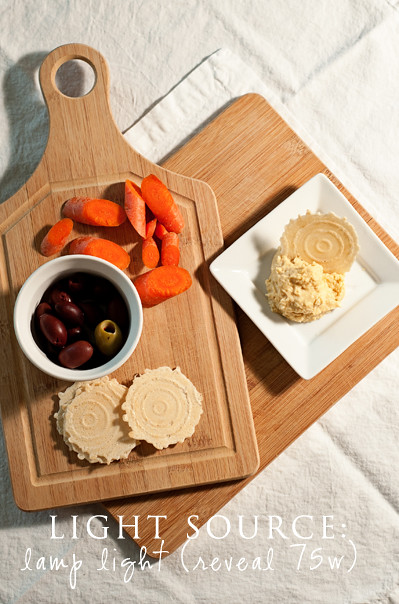
Next up, I found these new Reveal light bulbs that are supposed to mimic more natural light instead of the yellow or warm light from regular light bulbs.  In the image below I used one small lamp with a 75 watt light bulb.  I’m way more impressed with this bulb compared to the cheap bulbs in the previous images – and yes the Reveal bulbs are more expensive.  With just a few more of these bulbs I could remove some of the shadows from the olives and around the left side of the image.  I think my food is looking a bit better here and if I had no other light source I could definitely work with this image!  My camera has done a good job capturing more accurate color here.

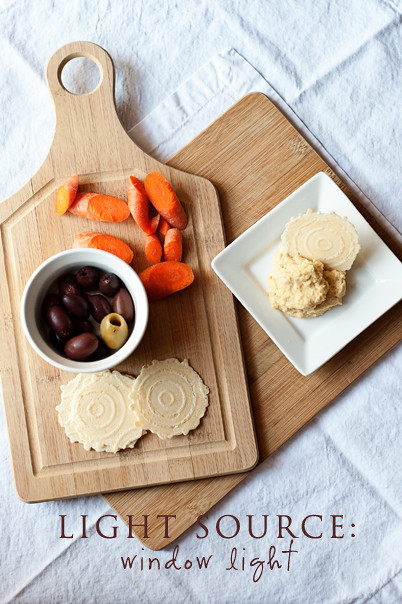
My favorite place to photograph in my apartment, however, is right up close to my windows.  There are only two decent windows where I can pull up props between 11-3 and get some great light.  I had just missed the best light of the day to take the image below, but I was pleased with the capture.  If you notice, with my camera set to Auto White Balance, the napkins have a slight blue tint or cooler temperature – this was due to light being mostly from the shady area outside the window.  I’m thinking this image looks good enough to take a few bites.

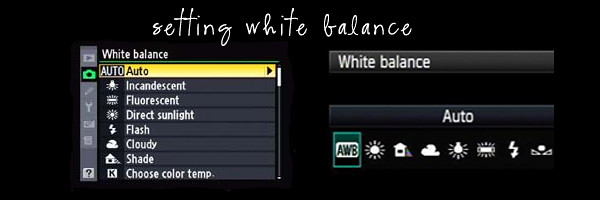
I hope you go back the top of this post and take one last look over the differences in the images. I’ve taken the same image, using the same camera and post processing (contrast and sharpening) but the light source has done some damage to these images. Because I used the Auto White Balance setting on my camera, my camera had no idea that the light source that I was using had a different color temperature. Light bulbs are warmer and cast a yellow glow, light from the shade outside or on a cloudy day is cooler and can cast a blue tint to images. Thankfully we can tell our cameras what light source we’re using so that the adjustments can be made before taking the picture. Here are two examples of camera menus where you can adjust the White Balance. Once the adjustments are made, the camera will make it’s own best adjustment to find the correct color for your images.

If you don’t like poking through menus or turning dials and you have a photo-editing software program, then I would highly recommend buying a gray card (mine is shown in the image below). By using a gray card in one of my images, I can tell my software program (e.g. Lightroom) that my gray card is 18% gray and that it should adjust the color of all remaining images based on that.

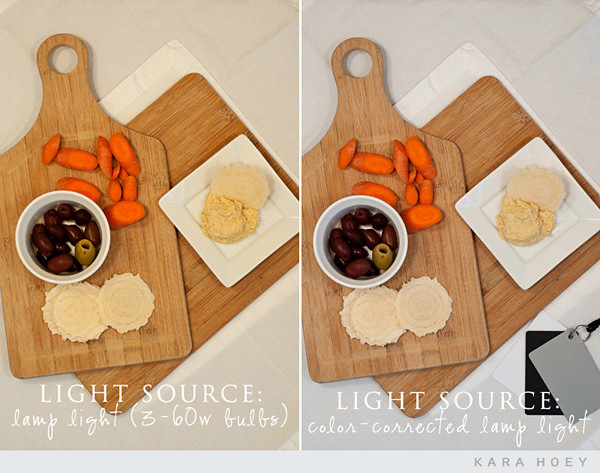
Here’s a side-by-side comparison of the image taken with the lamp light. The image on the left and right were taken using Auto White Balance. In the image on the right, I’ve included my gray card and told my software program to adjust the color. You end up with the color-corrected image on the right. I can use the same setting to adjust my image on the left so that the color is more accurate.

There’s so much more to learn about White Balance, so if you’re interested in learning more, pull out your camera manual or search for your camera settings online. I highly recommend learning how to adjust White Balance – especially if you use artificial lighting – your images will look more natural and hopefully appetizing!

Sea Glass Art

August 15, 2011

Last week, in a wild fit of productivity, I whipped up this pretty sea glass artwork for our bedroom. We have an awkwardly shaped (and tiny) bedroom and the wall opposite our bed was crying out for something to liven it up, but it took me a while to decide what it was going to be.

This sea glass art is exactly what it needed. Calming and pretty, not small, but not overwhelmingly big, and best of all it used up some of my stockpile of sea glass! I banned myself from collecting any more sea glass until I found a use for some of it. So, moratorium over! Yippee! Sea glass collecting is one of my absolute favorite things. It drives Michael nuts.

We have a kind of celery green and khaki/beige/cream thing going on in our bedroom, so I chose mostly yellow-y green pieces of sea glass for this project.

I’m hoping it looks a little more complicated than it actually was. In reality, it was pretty quick and simple. Here’s how I did it if you want to try it yourself!

Supplies:

Shadow box frame (I picked ours up at Ikea)
Craft glue
Sea glass
Thick paper, poster board or canvas (you don’t want the weight of the sea glass to pull the paper down)

Steps:

Take the mat out of the frame and glue the poster board or canvas to the back of it with craft glue. Arrange your sea glass on the canvas in the design you like. Glue each piece, one by one, and wait for the whole thing to dry overnight. (I didn’t wait until it was totally dry, stood it up, and half the sea glass slid down the canvas. Grrrr. It’s hard, but try to be patient.) Then put the mat and sea glass back in the frame and hang it up! It’s that easy!

It’s a really hard spot to photograph because our bedroom is so tiny! But there’s a shot in the reflection of my wardrobe mirror. Yes, that’s me. And yes, I stick my pinky out when I’m focusing my camera. It’s odd. And yes, those are purple pants I’m wearing. Seemed like a better idea at the time.


Friday Finds

August 12, 2011
{lush green photos by moi}

Ah, big sigh. Friday again. Phew.

How was your week? We had a busy, productive, whirlwind week. I received an email last week from someone from an American television show looking for a few photos of our little house. Who knows what they’ll think or what will come of it, but it meant I spent a good bit of time getting the house spruced up after being away for a week!

Turns out it was a great kick in the pants to finish a few projects that had been waiting way too long and I’ll have photos of those to share next week!

While I’m recovering, here are some crafty, yummy, fun links for your Friday!

I love this easy idea for turning your favorite song lyrics into art for your home. Where can I find those sticky letters in Dublin?? And don’t you just love the font on that cutie blog? So fun!

We’re still planning a garden party for September and these free printable invitations look perfect to get all our guests in the festive spirit!

I loved these short and sweet little videos. Incredible video editing, me thinks.

This roundup of farmer’s market prints is so sweet! I’d love a Dublin version for our kitchen!

I’m making a few treats for a get together on Sunday, but stumped as to what I’ll make. Maybe these mini-blueberry pies? Or  this insane no bake chocolate cake? Decisions, decisions.

What are you all up to this weekend? Big plans? We’re heading out to Mount Usher Gardens tomorrow for brunch with friends. Fingers crossed for dry weather! Hope you all have a lovely weekend!

Oh! And in case you missed From China Village this week, here’s Austria on Monday, Kara’s Photo Tip Tuesday, wine tasting Wednesday and Toasty Thursday for you!

Toasty: Honey Oatmeal Bread with Green Apron Raspberry Preserves

August 11, 2011

Good morning, readers! I’m back today with another toasty recipe for you!

This bread is one of my absolute favorites. I’ve shared it with you before when we were talking about individual beef pot pies, but it is fantastic on its own as toast. It’s a little sweet, a little dense and it’s flecked with oatmeal.

And the perfect jam pairing for it? Green Apron Raspberry Preserves, straight from Ballingarry! (That’s here, I checked.) Jam that tastes like real raspberries. Yum.

{and award-winning, too!}

Looks delish, right? Well, here’s the recipe for Honey Oatmeal Bread. Fits perfectly into two medium loaf pans.

Honey Oatmeal Bread

1 1/2 cups water
1/4 cup honey
1/3 cup olive oil
5 1/2 cups all purpose flour
1 cup quick cooking oats
2 tsp salt
4 1/2 tsp active dry yeast
2 eggs

Heat the water, honey and olive oil in a saucepan until it’s warm. Mix the dry ingredients together, saving 1/2 cup of the flour out. Pour in the warm mixture (take care it’s not too hot or you’ll kill the yeast – just warm and the yeast will be very happy) and mix until it starts to combine. Then add the two eggs and mix – I usually do this part with my fingers. It gets pretty sticky, but I think it works best. Add the remaining 1/2 cup of flour and knead until it’s just barely sticky.

Put the dough in a bowl, cover it with a clean dish towel, and let it rise in a warm spot for an hour. Then divide the dough into two medium loaf pans and let it rise in a warm spot again for another hour. Bake at 350F/180C for about 45 minutes or until it’s brown and toasty on the top and hollow if you tap on the top.

Now, for the Green Apron Raspberry Jam, you’ll have to find your own jar! Or you can go to their website to order your own!

Wine Tasting in the Austrian Alps

August 9, 2011

One of the highlights of my trip to Austria was a lovely lunch and wine tasting on the side of a mountain. The woman who runs the restaurant and guest rooms is the top sommelier in Austria, Anne Marie Foidl. She’s the kind of woman, when you meet her you just want to be her. Gorgeous, smart, beautiful accent and plain old nice.

She runs this incredible old mountain hut with a huge deck overlooking the Alps. We ate fresh cheeses and spreads and meats and breads looking out on an incredible, vast view. The food was incredible – all local and home made and in season. And the presentation was gorgeous – pretty glasses and napkin holders and table cloths. The platters of food were all decorated with mountain wildflowers. Just beautiful.

{The view from the deck!}
{Aren’t those the sweetest seats? What a lovely place to sit and enjoy the view!}
{Even the window boxes were perfect – I’d love to find some old wine boxes to plant geraniums!}
{I may have brought home a few of these pretty porcelain napkin holders – with permission, of course!}
{A whole bowl of pretty napkin holders!}

After lunch, she led us downstairs to the wine cellar, the hallways were lit with candles and the walls were lined with dusty wine bottles. We tried four wines and learned so much about Austrian wines. I was so smitten I even brought back a few bottles!

{The sommelier herself, in traditional dress}
{Dramatic lighting in the wine cellar.}
{Isn’t that an awesome moose candelabra?}
{And this clock might have been my absolute favorite in the whole cellar. Good thing I didn’t take it home too!}


Kara’s Photo Tips: Light, Bad to Good

August 9, 2011

Good morning, darling readers! Kara is joining us every Tuesday this month to share her fabulous photo tips. Here’s last week’s! Thanks, Kara!

Hello From China Village Readers! I hope you enjoyed last week’s tip on moving around your subject to get a variety of images.

This week we’ll be looking at sunlight and how to use it to get the best images of your subjects. I’ll be showing some of my images below and pointing out what was BAD and what was GOOD with my use of light.

Light_Kara Hoey1

As a photographer, light can be your best friend and your worst enemy.  I find the best light in the early morning or late evening, and the most difficult light during the middle of the day when it is strongest. Let’s take a look at several images below and break down what worked and what didn’t work.

The first set of images below were taken in the evening and they both show Max with direct sunlight on him.  In these images, the sun washed-out or flattened the colors, softened the blacks in his face, caused dark shadows where the light was not hitting, and caused Max to have crazy eyes.  Let’s look at the next set of images to see how I made better use of the light.

Light_Kara Hoey2

In the image below (on the left) I moved Max to a shaded area.  There is still sufficient light to create a nice even light on his body and face, his eyes are clearer with “catch-lights” from the sky, and the contrast is back in his face.  For the image on the right, I’ve repositioned myself so that the sun is behind Max which causes a nice rim of light around his body.  When back-lighting you should be familiar with your best camera setting/exposure adjustment so that the subject doesn’t end up completely black – unless you’re going for a silhouette.

Light_Kara Hoey3

Let’s look at another example.  The image on the left shows strong light coming in from the left side of Meredith.  It’s causing one side of her to be well-lit and the other side to be dark – causing a harsh contrast on her face.  She’s also squinting because of the bright light.  Since we really wanted a shot of her on the rocks, we had her dad stand off to the side and hold up a white shirt to diffuse the light that was falling on her face.  The image on the right was the result.  There is nice even light on her face and neck.  Although there is still some strong light on her arms and legs, the result was much prettier than the first image.

Light_Kara Hoey4

Here are a couple more examples.  For the image on the left I repositioned so that the light was behind her and to the left.  This caused light to enter into my lens, creating a sun flare.  I like this look – it’s quite pretty and soft.  The image on the right was taken as the sun set and there was the softest light resulting in nice even light on her skin.

Light_Kara Hoey5

When the sun is at its brightest, the first thing I look for is a nice shaded area.  I find that trees will usually provide this.  In both of the images below there was a nearby tree in the perfect spot to block the late morning sun.  In both of these image the trees helped to create pretty back light with a soft rim of light around their bodies.  When you’re using trees as a shade, make sure that the tree does not cast odd shapes on your subject.  Trees with thicker leaves and branches work best.

Light_Kara Hoey6

So there you have it, just a few examples of how to use sunlight to create the best images of your subjects. I highly recommend finding that early morning and late evening light – that light is soft and even.

I hope this helps you and encourages you to go capture some great images!

Austria in Photos

August 8, 2011

I had a lovely few days in Austria last week. Lots of sunshine, mountains, fresh air and delicious food. I’m a little worn out from all the traipsing, so I thought I’d just share a few photos with you as I ease back into reality! I’ll be back with more details on Wednesday!

{and there’s me – terrifyingly high up on a mountain!}

Friday Finds

August 5, 2011
  {pretty umbrella installation from here}

Last day in Austria and I am going to have some fantastic photos for you next week!

But since I’m still trekking around, I’ve got fun links for your Friday, as promised!

Would you believe most Irish people don’t eat peanut butter and jelly sandwiches? Crazy, right?! These peanut butter and jelly muffins would be a great entree!

Check out this adorable DIY printed fabric wrapping paper. What a great idea! And a very cool DIY rug painting project.

It’s not autumn yet, but I’m saving this recipe for crockpot apple butter for about October. Yum. Oh, and also these shrunken apple heads to float in autumn cider. Hilarious!

I’ll be back in Dublin late tonight, and will probably spend the weekend recovering from the week and catching up with my husband! What are you all doing? Big plans?


Toasty: Anadama Bread with Quince Jelly

August 4, 2011

A few months ago, I received a whole bunch of jams and jellies from a few different canning queens. I’ve been dying to try them all out, but with all the traveling, I didn’t have a chance until now.

I think the best way to try out homemade jams and jellies is with homemade breads. And there is just nothing more comforting than homemade bread with jam.

So over the next few weeks, I’m going to be baking lots of different breads to go with lots of different jams and jellies. And I’ll be sharing lots of recipes and photos with you too!

First up: Anadama Bread with {French} Quincy Jelly.

The national president of the ICA (who happens to be my traveling partner on this trip to Austria!) spends some of her summer weeks in France, where she makes lots of jams and jellies. She brought back a jar of quince jelly for me to try and I thought Anadama bread, a classic New England brown bread, might be the perfect partner.

See? Even the label’s written in French! Quince is a strange, hard fruit that’s looks like a cross between a pear and an apple. Making jelly out of it involves cooking it with water until it’s the consistency of apple sauce, and then straining it. Quince makes great jelly because it already has a lot of pectin in it.

And Anadama Bread is perfect toasting bread – it’s made with cornmeal and molasses, so it’s a little sweet and really moist.

Here’s a great recipe for quince jelly. It looks like it has a lot of steps, but it makes the prettiest rose-colored jelly.

And this, is the Anadama bread recipe from my childhood. My mom used to make it in a huge, heavy white bowl with a pink and blue stripe. That was the bread bowl.

Anadama Bread

1 cup corn meal (I used polenta from the health food store)
1 1/2 cups boiling water
2 tsp salt
1/4 cup butter
1/2 cup molasses (you can also find molasses at the health food store in Ireland)
2 packages yeast
1/2 cup lukewarm water
5 – 5/1/2 cups plain flour

Mix cornmeal, molasses, boiling water, salt and butter in a bowl until the butter is melted. Stir and cool the mixture until it’s lukewarm. Meanwhile, dissolve the yeast in the lukewarm water. Add the yeast to the molasses mixture with 1 1/2 cups flour and stir to incorporate until the flour isn’t streaky anymore. Add in the rest of the flour and knead until it’s mixed and not sticky. Let the dough rise for about an hour in a clean, greased bowl in a warm place until it doubles in size. Punch the dough down and divide it into two loaves. Let the loaves rise in bread tins for another half hour. Bake at 375F/190C for 35-40 minutes.

Let the bread cool (at least a little) before you slice it. Top it with butter and jelly. Yum.