
Good morning, darling readers! Kara is joining us every Tuesday this month to share her fabulous photo tips. Here’s last week’s! Thanks, Kara!
Hello From China Village Readers! I hope you enjoyed last week’s tip on moving around your subject to get a variety of images.
This week we’ll be looking at sunlight and how to use it to get the best images of your subjects. I’ll be showing some of my images below and pointing out what was BAD and what was GOOD with my use of light.

As a photographer, light can be your best friend and your worst enemy. I find the best light in the early morning or late evening, and the most difficult light during the middle of the day when it is strongest. Let’s take a look at several images below and break down what worked and what didn’t work.
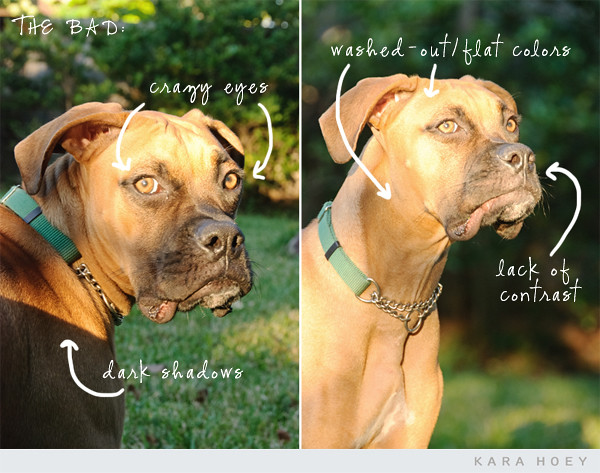
The first set of images below were taken in the evening and they both show Max with direct sunlight on him. In these images, the sun washed-out or flattened the colors, softened the blacks in his face, caused dark shadows where the light was not hitting, and caused Max to have crazy eyes. Let’s look at the next set of images to see how I made better use of the light.
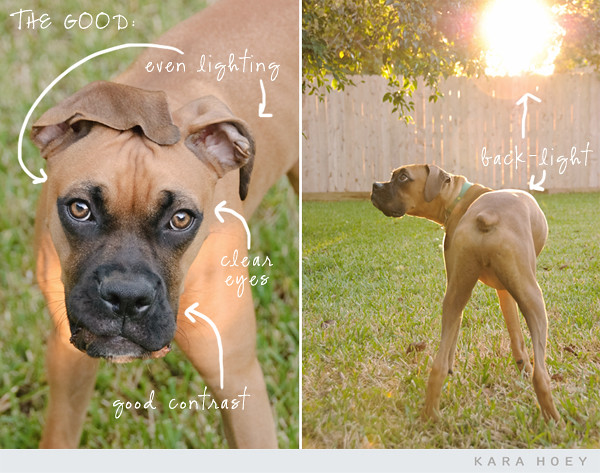
In the image below (on the left) I moved Max to a shaded area. There is still sufficient light to create a nice even light on his body and face, his eyes are clearer with “catch-lights” from the sky, and the contrast is back in his face. For the image on the right, I’ve repositioned myself so that the sun is behind Max which causes a nice rim of light around his body. When back-lighting you should be familiar with your best camera setting/exposure adjustment so that the subject doesn’t end up completely black – unless you’re going for a silhouette.
Let’s look at another example. The image on the left shows strong light coming in from the left side of Meredith. It’s causing one side of her to be well-lit and the other side to be dark – causing a harsh contrast on her face. She’s also squinting because of the bright light. Since we really wanted a shot of her on the rocks, we had her dad stand off to the side and hold up a white shirt to diffuse the light that was falling on her face. The image on the right was the result. There is nice even light on her face and neck. Although there is still some strong light on her arms and legs, the result was much prettier than the first image.

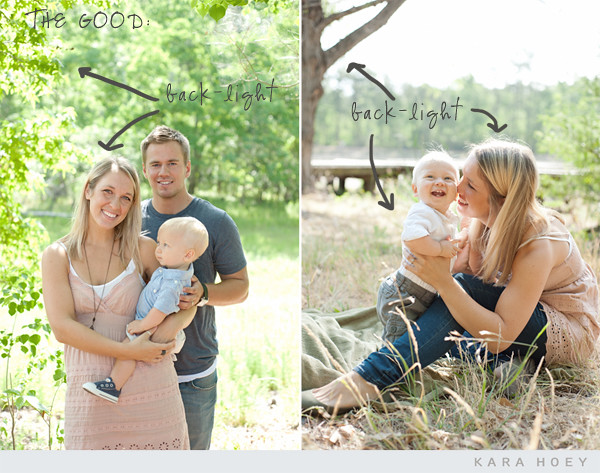
Here are a couple more examples. For the image on the left I repositioned so that the light was behind her and to the left. This caused light to enter into my lens, creating a sun flare. I like this look – it’s quite pretty and soft. The image on the right was taken as the sun set and there was the softest light resulting in nice even light on her skin.

When the sun is at its brightest, the first thing I look for is a nice shaded area. I find that trees will usually provide this. In both of the images below there was a nearby tree in the perfect spot to block the late morning sun. In both of these image the trees helped to create pretty back light with a soft rim of light around their bodies. When you’re using trees as a shade, make sure that the tree does not cast odd shapes on your subject. Trees with thicker leaves and branches work best.
So there you have it, just a few examples of how to use sunlight to create the best images of your subjects. I highly recommend finding that early morning and late evening light – that light is soft and even.
I hope this helps you and encourages you to go capture some great images!
No Comments